About the blog

This blog is an expression of our love and enthusiasm for creativity in the form of make up, nail art, crochet and more. We believe in B.L.O.T be it something as basic as applying your kajal every morning or a DIY project. The very idea of writing this blog is to have a platform to share and express our ideas and love for creativity.

Saturday 16 March 2013

The Pineapple cowl!

 Hey people!


This is the first crochet post of the blog though a bit too late. Its a simple crochet cowl . I chose  a bright reddish orange color to accessorize and brighten up the gloomy winter days.The stitch used is a small cluster of sorts and I'd like to call it the 'Pineapple stitch'. This is what the stitch looks like.


The instructions of the stitch are given below :
 "YO and draw up a loop through indicated space; YO and pull through two loops on hook" (Repeat "to " two more times). YO and pull through all four loops on hook.

                                                 In progress.

The finished product :)


Thursday 14 March 2013

Splash of colors!


Splash of colors - Whirlpool nail art!


 Here is a really colorful  nail art that I did yesterday. I feel there isn't much for me to write coz the pictures do all the speaking. The technique I used is different from the typical water marble. However the results were a lot similar and equally good. See for yourself and judge :)


Things used :


Some more pics


Tuesday 5 March 2013

Candles!


 DIY CANDLE STANDS!


Hiii!!! Today I'm gonna be sharing some really simple DIY candle stands that I did a couple of days back.You really dont have to be an expert with DIYs to make your own pretty candle stands. All you need is some basic stuff like old glass jars, glasses etc and a li'l bit of creativity to make it all work!!
Browse through the pics and hope you like them.


Sunday 24 February 2013

Purple haze


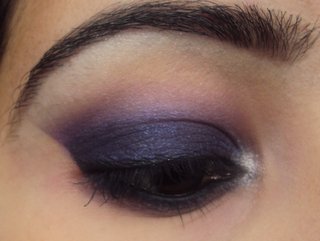
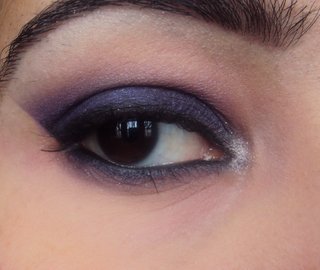
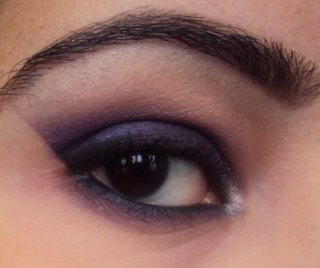
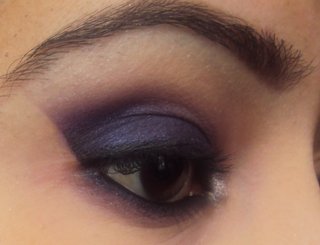
 Purple haze -An Arabic smokey eye!!


Hey beauties! Hope you are doing good. This is the first eye look on this blog and I thought of creating something with my new Sephora eye palette. I decided to go vibrant and ended up choosing  an eye look using purple shadows.So, here it goes :


Products used:


1.Inglot eye base 01

2.Maybelline drama gel eyeliner black

3.Purple eyeshadow from sephora palette

4.Urban decay shadow- flash

5.Maybelline chai latte quad –brown shadows

6.Oriflame eye liner

7.Estee lauder double wear mascara

8.Mac pigment powder in vanilla


 1. First I primed my lids with the inglot eye base in 01. I applied it with my clean finger all over the lid. This will help the shadows to last long and pop better. U can skip this step coz we 're anyways using another dark base.

2.Next apply a piece of scotch tape on the side of lids. The upper edge of the tape should be somewhat in line with the waterline .


3.Apply some maybelline gel liner in black on the lid with a synthetic brush till the crease. Smudge the edges before it sets with a fluffy brush . Go all over on the lid til the tape.

4. Take some purple shadow on a packing brush n pat it over the black base. U can leave the inner corner. Layer it patiently till the purple is vivid. I used the matte purple from the sephora palette. Put the same shadow on lower lash line with a pencil brush n smoke it out a little.

5.Take a brighter purple on an eye shadow brush and apply on the crease.I used flash from urban decay. Now blend the shadow with a fluffy brush properly. Remember no harsh lines should be visible.


6. Now highlight the inner corner and the brow bone with a light shadow.I first used the white in the sephora palette but found it too glittery, then used mac pigment powder in vanilla. Love the affect it gives.

7.Line the upper lash line with the gel liner and follow the tape at the end.and line the lower line with a kohl or pencil. I used oriflame pencil in black.
                                            

8.Curl your lashes and apply mascara. Estee lauder double wear is what I used here

9.Comb your brows and fill them in with a Matte brown shadow.I mixed the two browns from chai latte quad from maybelline and applied with an angle brush.

10.Remove the tape carefully. Apply some concealer on the under eyes and Set with translucent powder.
 
And you are done!


Monday 18 February 2013

Black and white nail art


Black and white!


Heya pretty gals! We are here again. This time with a NOTD (nails of the day) .The theme we chose today is BLACK N WHITE. We did not want a monotonous nail  art so we chose to do  each nail differently but with the same colors. The designs include a hounds tooth (thumb), a water-marble  like nail art  (middle finger) , a linear pattern(index finger), a scaly nail art(ring finger) and a tribal Aztec  design (little finger).The pictures are as follows.Let us  know if u like the designs n if u want a step by step tutorial.


Products used 


                                              Uniform white base.

                                                        
                                            At work :)


                                              A li'l more work done!

                                                   
                                             Water marble


                                                Almost done :)
                                            

                                               Ta da! The complete look :)


Saturday 16 February 2013

The first post!


                               Garnier BB cream- Review


Here we go with the first post of the blog.Review of the newly launched Garnier BB cream.
The market is flooded with Beauty Benefit (BB) creams these days . Both high end and drugstore brands are coming up with BB creams. BB creams claim to give some coverage and moisturize the skin at the same time. One of the affordable BB creams launched recently is the Garnier BB cream.The review goes as follows.


                                                                                    How the product claims to work
This  all-in-one high performance skin care contains vitamin C derivative known to have anti-oxidant properties. It helps boost skin glow and brightness.  Enriched with mineral pigments, BB cream instantly beautifies your skin. It instantly spreads evenly for a flawless finish.


My experience
The Garnier BB cream is the most pocket friendly BB cream available in the Indian market as of now. The cream, as it claims is light weight ,smoothens out the skin and gives a sheer glow . It also has an SPF of 24 which is an added attraction. Once you apply the cream ,it doesn’t feel heavy ,sticky or oily. It does give a very sheer coverage but doesn’t cover up blemishes and other imperfections. If you are looking for light coverage with some SPF  this is the cream for you. It also moisturises the skin but girls with dry skin may not find it as moisturising. It is apt for oily to combination skin. The product has a subtle but nice and refreshing smell.


Pros
·         Inexpensive
·         Comes with an SPF
·         Adds a subtle glow to the skin
·         Easily available in the Indian market
·         Smells refreshing
Cons
·         Available in only one shade. Duskier girls might find it too light for their skin tone
·         Doesn’t cover up blemishes and imperfections
·         Not suitable for dry skin.


Overall rating : 3/5


Final verdict
  Suitable for daily use, especially for office goers. Saves you the time and effort of applying sunscreen, moisturiser and a foundation separately but does not give you a good coverage.